Image Pre-Processing
Overview
The AIForged Image Processor is a utility service used to pre-process documents before OCR or downstream extraction. By applying operations such as background whitening, comment removal, deskewing, noise reduction, and more, this utility can dramatically improve OCR accuracy and the reliability of downstream workflows.
Info
Use the Image Processor as a pre-processor to clean up scans, remove unwanted marks, or normalize visuals before handing documents off to OCR or classification services.
Permissions Required
Members must belong to one of the following AIForged user group roles to add and configure this utility:
- Owner
- Administrator
- Developer
Info
Tip: Role membership is managed in Organisations > Roles. Assign members to roles to grant agent and service administration access.
Supported Content Types
- PDF (all pages will be processed)
- TIFF (single or multi-page)
- JPEG
- PNG
Info
If your content is in a different format, use the AIForged PDF Converter before processing.
Possible Use Cases
- Remove watermarks, pen marks, or bank stamps that interfere with OCR.
- Deskew or rotate scanned pages to proper orientation.
- Convert to greyscale or invert colors to standardize inputs.
- Whiten backgrounds for better contrast and OCR accuracy.
- Clean up legacy or poorly-scanned documents before classification or extraction.
Add as Utility (Pre-/Post-Processor)
Utility services are not configured as standalone services. Attach them to a parent service either from the parent’s service view or from the service flow configurator.
Option A: From Parent Service View
- Open the parent service.
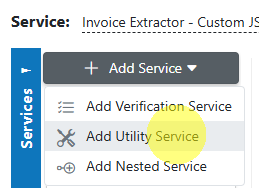
- Click the Add Service dropdown and select Utility Service.
- Choose AIForged Image Processor.
- In the utility’s settings, specify when it should run:
- Execute Before Process = Pre-processor
- Execute After Process = Post-processor
Option B: From Service Flow Configurator
- Open the parent service’s Service Flow Configurator.
- Expand the Utility Service Types group.
- Drag the Image Processor utility onto the parent service:
- Drop to the left for Pre-processor.
- Drop to the right for Post-processor.
- Save.
Info
Utilities run as part of the parent’s lifecycle. Use Execute Before Process or Execute After Process to control the timing. Avoid configuring utility services as standalone services.
Processing Operations
The following image pre-processing operations are available:
| Operation | Description |
|---|---|
| Remove Comments | Remove any electronic comments from PDFs. |
| Rotate | Rotate the pages of a document. Use for deskewing or correcting scan orientation. |
| Greyscale | Convert the image to greyscale for more consistent OCR results. |
| Invert | Invert the colors of an image (black ↔ white). Useful for certain scan types. |
| Mirror | Mirrors (flips) an image horizontally. |
| Remove Garbage | Removes small spots (e.g., pen marks, dust) that may interfere with OCR. |
| Remove Color Marks | Remove colored marks (e.g., stamps, highlighter) that can affect OCR accuracy. |
| Whiten Background | Specify lower/upper greyscale bounds (0–255) to whiten backgrounds and remove watermarks or shadows. |
Example: Watermark Removal
Consider the document below, with a "DRAFT" watermark.

The AIForged Image Processor can be configured to remove the watermark and whiten the background:
Service Configuration Settings
Key configuration options (may vary by environment):
- Enabled: Turn the service on or off.
- Execute On Trigger: Run automatically on document upload/update/delete.
- Execute Before/After Process: Specify if the processor runs as a pre- or post-processor.
- Remove Comments: Enable to strip out PDF comments/annotations.
- Rotate: Degrees to rotate (common: 0, 90, 180, 270, or small values for deskew).
- Greyscale/Inversion: Enable as needed for your workflow.
- Remove Garbage/Color Marks: Enable to clean up marks/stamps.
- Whiten Background: Set lower and upper bounds for background whitening (0 = black, 255 = white).
- Archiving Strategy: Days before processed documents are deleted.
- Document Processed Status: Status to apply after processing (helps downstream routing).
Info
Tip: Start with a single operation, test, then enable more as needed. Over-processing can sometimes remove desired content!
Known Limitations
- Over-aggressive cleaning can sometimes remove desired information (e.g., signatures, light text, or official stamps).
- Processing time increases with document length and image complexity.
- Very dark or low-contrast originals may require multiple passes or adjustment of whitening bounds.
- Settings are global per service—test with a representative sample.
Troubleshooting Tips
- OCR accuracy not improved?
- Experiment with different combinations (e.g., try Greyscale + Whiten Background + Remove Garbage).
- Verify that desired content hasn’t been removed by over-aggressive cleaning.
- Background still not white enough?
- Adjust lower/upper greyscale bounds in the Whiten Background setting.
- Key information missing after processing?
- Check if Remove Comments, Whiten Background, or Remove Color Marks is too aggressive for your use case.
Best Practices
- Always pilot with a small set of documents to fine-tune your pre-processing chain.
- Deskew and whiten backgrounds for scans with heavy watermarks or poor orientation.
- Use Remove Garbage and Remove Color Marks for forms with stamps or hand marks.
- Combine with PDF Converter and Image Splitter utilities for optimal input normalization and routing.
- Set Document Processed Status for clear workflow hand-off.
FAQ
- Can I apply multiple operations at once?
- Yes—combine as many as needed for your use case. Test your chain on sample docs to avoid removing desired content.
- How do I know which settings to use?
- Start with the most obvious issue (e.g., watermark, skew), test, and then incrementally add more processing.
- Will this work on color scans?
- Yes—most operations (e.g., Greyscale, Remove Color Marks) are designed for both color and black-and-white scans.
- How do I revert if the output is too aggressive?
- Adjust or disable one operation at a time and re-test with your sample document.