Webhooks
Webhook Utility
Overview
The Webhook Utility in AIForged allows you to call an external API automatically when key events occur in your workflow—such as when a document’s property changes (e.g., status, category). You can configure the request body in C#, shape the payload as needed, and trigger calls for fine-grained integration with your external systems, SaaS tools, or custom endpoints.
Info
Tip: Use webhooks for real-time integration—notify external systems when documents are created, updated, or processed, or trigger downstream automation when business milestones occur.
Permissions Required
Members must belong to one of the following AIForged user group roles to add and configure this utility:
- Owner
- Administrator
- Developer
Info
Tip: Role membership is managed in Organisations > Roles. Assign members to roles to grant agent and service administration access.
Supported Content Types
- JSON (default, customizable via C# code)
- Any HTTP payload type (you can set Content-Type and build the body as required)
Info
Webhook payloads are typically JSON, but you can fully control the outgoing request body and headers in your configuration.
Possible Use Cases
- Notify external CRM, ticketing, or analytics systems when a document reaches a specific status.
- Push lightweight event data to dashboards, monitoring tools, or integration middleware.
- Trigger downstream pipelines (CI/CD, RPA, etc.) as soon as documents are processed in AIForged.
Add as Utility (Pre-/Post-Processor)
Utility services are not configured as standalone services. Attach them to a parent service either from the parent’s service view or from the service flow configurator.
Option A: From Parent Service View
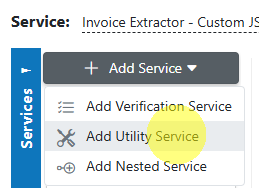
- Open the parent service.
- Click the Add Service dropdown and select Utility Service.
- Choose WebHook Utility.
- In the utility’s settings, specify when it should run:
- Execute Before Process = Pre-processor
- Execute After Process = Post-processor
Option B: From Service Flow Configurator
- Open the parent service’s Service Flow Configurator.
- Expand the Utility Service Types group.
- Drag the WebHook utility onto the parent service:
- Drop to the left for Pre-processor.
- Drop to the right for Post-processor.
- Save.
Info
Utilities run as part of the parent’s lifecycle. Use Execute Before Process or Execute After Process to control the timing. Avoid configuring utility services as standalone services.
Service Configuration Settings
Below are the main configuration settings, mapped to the wizard tabs and shown in your screenshots:
General
- Enabled: Enable or disable this service.
- Username: Username for webhook credentials (if required).
- Password: Password for webhook authentication or for the webhook user.
- Method: HTTP method (GET, POST, PUT, HEAD, DELETE, PATCH, OPTIONS, CONNECT).
- URL: Endpoint of your webhook (can include template tokens for dynamic URLs).
- Body: The HTTP body sent with the webhook (template, static value, or built in Custom Code).
- API Key: API key for authentication (if required).
- API Key Header: Header name where the API key should be sent.
- Execute On Trigger: Run the utility on document events like upload/update/delete.
Auto Execution
- Batch Size: Number of webhook events to process per run.
- Execute After Process: Run after the parent service processes documents.
- Execute Before Process: Run before the parent service processes documents.
Processing
- Document Processed Status: Status to apply after the webhook fires.
- Status: The document status to filter or set.
- Force PDF Image: (Rarely used) Remove all PDF objects/layers/widgets and use images only.
Advanced
- Archiving Strategy: Days before webhook configuration or logs are deleted.
- Remove Comments: Strip comments from payload if needed.
- Category, Usage, Extension, Pattern: Filter which documents trigger the webhook (by category, usage, extension, or filename pattern; supports RegEx).
- Content Type: Sets the Content-Type of the HTTP request (e.g., application/json).
- Domain: Domain for webhook credentials, if required.
- Retry Count / Delay: Configure retry attempts and delay between retries if webhook fails.
Info
Tip: If you’re unsure about a field, start with defaults and refine after testing your integration.
How to Build Your Payload (C# Example)
You can construct the webhook body in C#. Example for a JSON payload:
return JsonSerializer.Serialize(new
{
    DocumentId = doc.Id,
    MasterId = doc.MasterId,
    ProjectId = project.Id,
    ServiceId = doc.ServiceId,
    DateCreated = $"{doc.DTC:yyyy-MM-ddTHH:mm:ss.fffZ}",
    DateModified = $"{doc.DTM:yyyy-MM-ddTHH:mm:ss.fffZ}",
    Filename = doc.Filename,
    Category = $"{doc.ClassId}",
    Status = $"{doc.Status}",
    Comment = doc.Comment,
    Result = doc.Result,
});
- Place this code in your Webhook’s Body or in a Custom Code block.
- Customize fields as needed for your target system.
Real-World Webhook Payload Example
Suppose your organization wants to automatically create a case in an external ticketing system whenever a document’s status changes to “Exception.” Here’s how you might structure your C# payload in the webhook utility:
// This example sends a payload to a generic ticketing or CRM system API
return JsonSerializer.Serialize(new
{
    case_id = doc.Id,
    reference = doc.Filename,
    agent_name = project.Name,
    category = doc.ClassId,
    status = doc.Status,
    comment = doc.Comment,
    created_at = doc.DTC.ToString("o"),
    updated_at = doc.DTM.ToString("o"),
    document_url = $"https://aiforged.example.com/docs/{doc.Id}"
});
- Tip: Adjust field names to match your external API’s requirements (e.g.,
case_id,ticket_ref, etc.). - Headers: Use the API Key and API Key Header fields in the webhook settings for authentication (e.g.,
Authorization: Bearer ...).
Add and Process Documents
To wire up a webhook for real-time integration:
- Attach the Webhook Utility to a parent service (pre- or post-processor).
- Configure the endpoint URL, HTTP method, authentication, and payload template or code.
- Set any filters needed (Category, Usage, Status, etc.).
- Save and test with a typical document event (e.g., status change).
Info
Tip: Always test with a controlled event and a development endpoint before enabling in production.
View Webhook Activity
- Check your external system’s logs to confirm receipt and structure of the webhook payload.
- Review any failures, timeouts, or retries in AIForged’s logs or as surfaced in your endpoint.
Known Limitations
- Network issues may cause delivery failures; use retries and monitor endpoint SLAs.
- Payload size is limited by the HTTP client/server (keep payloads compact).
- Authentication and HTTPS requirements must be met by the external endpoint.
- If you use filtering (by category, usage, extension, etc.), ensure your rules match the intended events.
Info
Tip: Use the Retry Count and Retry Delay settings to gracefully handle temporary endpoint outages.
Troubleshooting Tips
- No webhook received?
- Double-check the endpoint URL and ensure the service is enabled.
- Confirm the event filter (Status, Category, Usage, etc.) matches your test document.
- Verify network access and authentication.
- Malformed payload or errors?
- Validate the payload structure in your code or template.
- Make sure required fields are present and correctly serialized.
- Repeated failures or retries?
- Inspect endpoint logs for errors.
- Adjust retry settings or review endpoint rate limits.
Best Practices
- Always document your webhook contract (fields sent, format, and expected responses).
- Use concise, well-structured JSON payloads.
- Secure your webhook endpoint—use API keys, secret headers, or IP whitelisting.
- Test with a safe endpoint before switching to production.
- Use filtering to avoid unnecessary calls for documents/events you do not care about.
Quick Start
Get a webhook integrated in minutes:
- Attach the Webhook Utility to a parent service as a pre- or post-processor.
- Configure the endpoint, HTTP method, headers, and payload (body).
- Enable or schedule the utility.
- Trigger a test event and verify delivery.
Info
Tip: Use a service like webhook.site or a local mock server for initial testing.
FAQ
- How do I test my webhook integration before going live?
- Use a service like webhook.site as your endpoint to inspect the payload and headers.
- Once you are satisfied with the structure, point the webhook at your production endpoint.
- Can I trigger multiple webhooks for different events or services?
- Yes. Add multiple Webhook Utility services, each with its own trigger and target endpoint.
- How do I add custom authentication headers (e.g., Bearer token, API key)?
- Use the API Key and API Key Header fields in the utility settings, or add custom headers in your webhook configuration.
- Can I control when the webhook fires (e.g., only on specific status changes)?
- Yes. Use the Status, Category, Usage, and Pattern filters to ensure the webhook only triggers on relevant document events.
- How do I handle error responses from the external system?
- Webhook calls are logged in AIForged. If a call fails, you can review the response for diagnostics.
- Use the Retry Count and Retry Delay options to automatically retry failed calls.
- Is it possible to receive a response from the external system and use it in AIForged?
- Webhooks are one-way by design. If you need to capture a response, log it in your external system or design a callback to AIForged via its API.
- Can I add dynamic values (like document category or a download link) to the payload?
- Yes. Use C# code in your payload template to include any document or agent property.
- What if the webhook endpoint is temporarily unavailable?
- Configure the Retry Count and Retry Delay to automatically retry delivery. Failed attempts are logged for review.
- How secure are webhook calls from AIForged?
- Always use HTTPS endpoints and include authentication headers. You can further secure by whitelisting AIForged IPs or using custom secret headers.